Author: Devil Slayer
Introduction:
From primary school, we all know that a perfect line is series of an infinite number of points sorted together in space. Each point has an infinitely accurate position on space meaning that the coordinates of each point is a floating point number with an infinite amount of numbers behind it’s point. Unfortunately, our computer is far from perfect, and cannot calculate infinite values. That’s why a computer always draws a line as near as possible to the real thing. Any beginner programmer quickly realizes that screen shows images using pixels, whose coordinates can only be determined using integer numbers. How does he then draw those beautiful circles, etc..? Let’s get right down to business:
Lines:
I’ve seen and heard of many methods to draw these simple objects and they all seemed exaggerated to me. I mean, how much can you optimize this simple piece of code?? However, it is understandable, because lines are usually used to draw many other primitives, like squares and triangles.
I will, anyway, use a simple technique, which will determine the position of each pixel to be lit, and then use a simple putpixel routine. (I program in C++ using Allegro, but these examples will be so easy that you should have no problem rewriting them to anything else; I also recommend everybody to check the source code of any graphics library (like the document “gfx.c” in Allegro’s source) for it is an excellent “source” of information):
hline() and vline() [horizontal and vertical] is the simplest of all lines. The method is to go from one end of the line to the other putting pixels all the way. Something like this:
void hline(int x1, int x2, int y) //x1 is the beginning x coord.; x2 is the end one; y is the y coord.
for(int i=x1; i<=x2; i++) putpixel(i,y);
Or in plain English: if “i” is the number, which starts from x1 and ends on x2, put a pixel on the coordinates (i, y). “i++” has the same meaning as “i=i+1″.
vline() is pretty much the same, just that coordinates are switched:
void vline(int x, int y1, int y2)
for(int i=y1; i<=y2; i++) putpixel(x,i);
Isn’t it easy so far? But what if our line is not horizontal or vertical? Computer graphics experts have made many methods to deal with this, but we’ll do the simplest…
We want to get something like this:
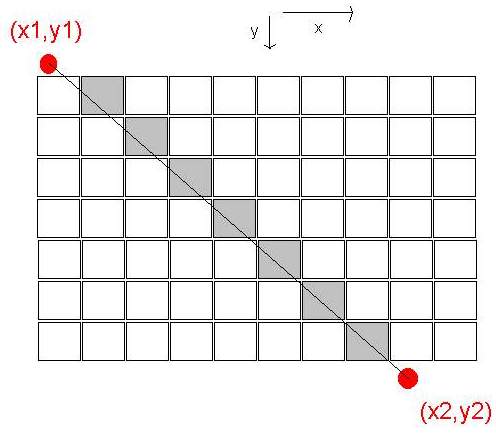
Imagine that the little squares are actually pixels, the two red dots are virtual beginning and end of the line, and the thin black line connecting the two dots is a virtually perfect line, or something we want to get as close to as we can. The gray colored pixels would be more or less something we see on the screen.
There are two algorithms we can use, each for its own type of situation:
1. First would go something like this: we follow the “x” coordinate one-by-one, and calculate the “y” as the same percentage “x” made on its length. This sounds a bit inaccurate, but basically we want to achieve that “x” and “y” meet at the end. Look at the code first:
void line(int x1,int y1,int x2,int y2)

{

  int x,y;

  for(x=x1; x<=x2; x++)          //we follow x coord. one-by-one
  {

    y=y1+(((y2-y1)/(x2-x1))*(x-x1));   //y is the same precentage of trip x made on its trip

    putpixel(x,y);

  }
Note that the division procedure could lead to a float value, but it’s truncated to integer (that’s why our line isn’t infinitely perfect). If this is still not clear to you, notice that when x gets equal to x2, x-x1 will cancel out with x2-x1 and you will be left with y1 + y2 - y1 which is actually y2. So, when x becomes x2, y becomes y2.
2. The other algorithm is the same as the first one, but this time we move one-by-one on the y coordinate:
void line(int x1,int y1,int x2,int y2)

{

  int x,y;

  for(y=y1; y<=y2; y++)          //we follow x coord. one-by-one
  {

    x=x1+(((x2-x1)/(y2-y1))*(y-y1));   //y is the same percentage of trip x made on its trip

    putpixel(x,y);

  }
We use the first algorithm when (y2-y1)<(x2-x1), and the second when (y2-y1)>(x2-x1). That’s because if we used the first one in the second situation we would get a broken line. Check these pictures out:
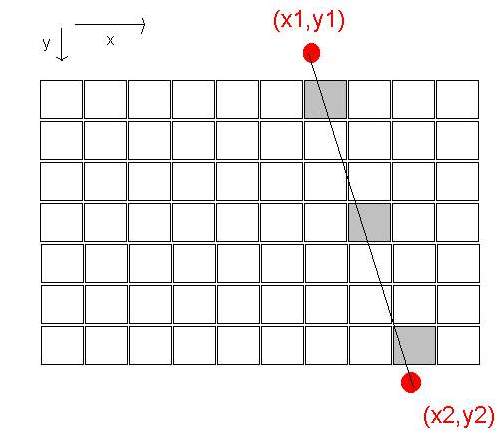
BAD
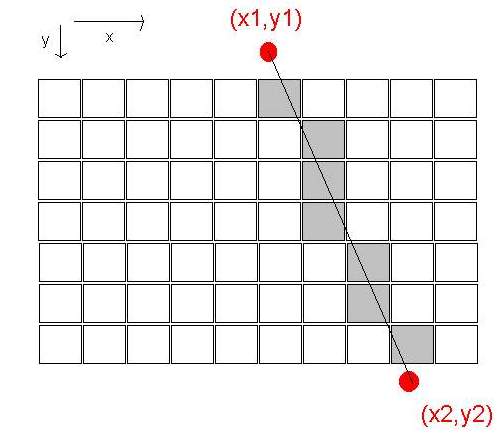
GOOD
Note: you could optimize this code by throwing the things that can be precalculated, before the loop:
void line(int x1,int y1,int x2,int y2)

{

  int x,y;

  double d=(x2-x1)/(y2-y1);     //double for accuracy

  for(y=y1; y<=y2; y++)          //we follow x coord. one-by-one
  {

    x=x1+(d*(y-y1));    //y is the same precentage of trip x made on its trip

    putpixel(x,y);

  }
I will leave making the complete algorithm to the user. It should check whether to use method one or two and maybe check the clipping, so that the line doesn’t go of screen. To make thicker lines just draw several more pixels instead of one each time. You should also make sure that x2 is always bigger then x1 and y2>y1 using this neat trick:
if(x2
x2^=x1;
x1^=x2;
x2^=x1;
}
if(y2
y2^=y1;
y1^=y2;
y2^=y1;
}
Now I’ll get right down to circles cause you make squares and triangles simply from connecting lines. Maybe in the next version of this tutorial I’ll write something about filling these objects…
Circle:
I will describe two methods of drawing circles: one will be using a simple property of all circles, and the other will be a bit more complex and will help us to later draw spirals.
1. Each circle has a simple property that each of his points is in the exact same distance from the center. That distance is called radius:
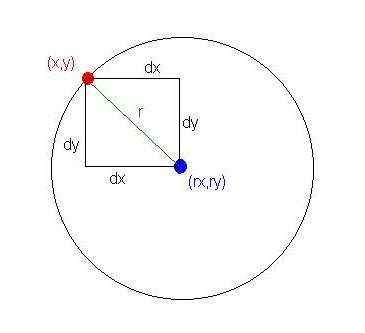
dx = abs(rx-x) and dy=abs(ry-y) // [abs()-absolute value]
So from simple mathematics we can say that: dx^2 + dy^2 = r^2 for every point of the circle…
The procedure practically checks each point in a square 2r*2r and if one of them fits the condition then we putpixel() there:
void circle(int rx, int ry, int r)

{

  int x,y;

  for(x=rx-r; x<=rx+r; x++)

    for(y=ry-r; y<=ry+r; y++)

      if (((x*x)+(y*y))==(r*r)) putpixel(x,y);

}
And that’s it!
If you run this program you may notice that the circle is broken. That’s because, again, the screen isn’t perfect so he’ll hardly get that x^2 + y^2 equals “exactly” r^2. To fix this little inconvenience one has to ease up this “tight” condition:
void circle(int rx, int ry, int r, int f)

{

  int x,y;

  for(x=rx-r; x<=rx+r; x++)

    for(y=ry-r; y<=ry+r; y++)

      if ( (((x*x)+(y*y))>(r*r)-(f/2)) && (((x*x)+(y*y))<(r*r)+(f/2)) ) putpixel(x,y);

}
So it’ll fill all points between -(f/2) and +(f/2) of the primary condition. By changing the “f” parameter you change the thickness of the circle.
To make a filled circle:
void circle(int rx, int ry, int r)

{

  int x,y;

  for(x=rx-r; x<=rx+r; x++)

    for(y=ry-r; y<=ry+r; y++)

      if (((x*x)+(y*y))<(r*r)) putpixel(x,y);

}
It draws every point lying inside the radius… This method of drawing is very cool cause just playing with conditions you can make marvelous images. You could also change the color of the pixel, for example, the closer to the center the darker the color…
Just to show you how cool this method can be, take a look at this simple fractal (It’s called Sierpinski’s triangle):
void Sierpinski()
{
int x,y;
for(x=0; x
}
2. The other method is more similar to the line procedure, but more complex. It is based on trigonometry. This was actually my school assignment, so I thought about for a long time and finally came to a solution. First I started out with a whish to make an algorithm that would calculate x and y coordinates of each point starting at the top of the circle and going clockwise all the way around it. I felt that it had something to do with trigonometry. Half of trigonometry is based on circles, so I wanted to reverse this process, but didn’t know how. One argument that told me it was possible that both circles and trigonometric functions are both smooth and round, so they had to be connected somehow.
To make a long story short, I finally conducted this explanation:
-if we start from the top of the circle and watch the X coordinate of each pixel we we’ll see that they increase to a certain point, then decrease for the same amount, then decrease once more and finally increase to return to the same point it started. Does that remind you of something? Let’s put it on paper and then make it a bit smoother:
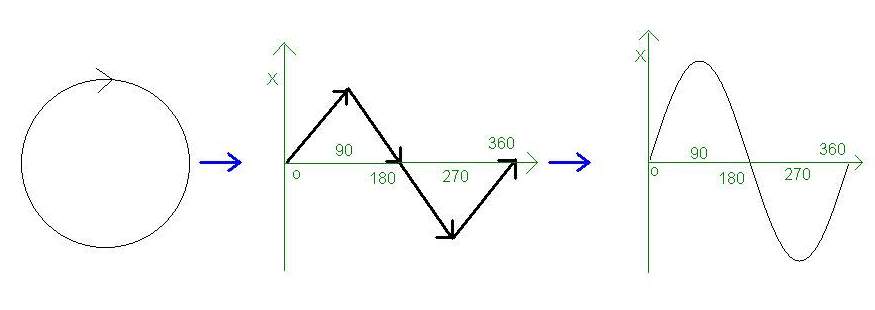
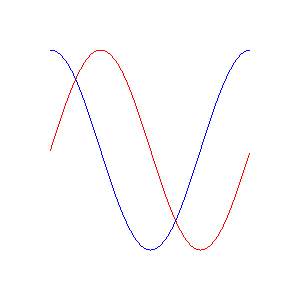
Yes, it’s a sine! For you that still don’t get it: X coordinates in a circle move exactly the same as the numbers in the sine function, that means they can now easily be calculated. Y coordinate is very similar only it’s shifted 90 degrees (or PI/2) to right. On the drawing above, red sinusoid is for the X coordinate and blue for Y.
So, we will calculate each point as the distance of the coordinate from the center of the circle by a value calculated from a sinusoidal function. But, how do we control the radius? As we all know sine returns values from -1 to 1 and our X coordinate (and Y for that matter) takes values from -R to R, so it turns out we only have to multiply the value of sine with R and we get our circle:
#include
{
int x,y;
double d;//detail
const double pi = 3.14159265; //more or less
  for(d=0; d<=2*pi; d+=0.01) //you can play with the value to be added to d

  {

    x=rx+sin(d)*r;

    y=ry+sin(d+(pi/2))*r;

    putpixel(x,y);

  }

}
You can play with the algorithm to get ellipses by multiplying the sine with a certain value:
void circle(int rx, int ry, int r)

{

  int x,y;

  double d;//detail

  const double pi = 3.14159265; //more or less
for(d=0; d<=2*pi; d+=0.01) //you can play with the value to be added to d

  {

    x=rx+(3*sin(d))*r;

    y=ry+(2*sin(d+(pi/2)))*r;

    putpixel(x,y);

  }

}
That stretches the circle 3 times on X and 2 times on Y-axis. Unfortunately, I haven’t come up with a way to make my ellipses rotate. This would probably mean fiddling with the sine, which is above my current mathematical knowledge.
We’re just one step from creating spirals so let’s get going.
Spirals:
Spirals can be made in different ways. I’ve heard of people that create spirals off of arcs, but I wanted to do it better.
Spirals and circles are actually pretty similar. The only differences is that spirals don’t end after 2*pi (360 degrees) and that their radius increases (starting from zero).
What we want to do is modify the existing circle algorithm to finish after, let’s say, 8*pi (which makes 4 full turns) and make r increase:
void spiral(int rx, int ry)

{

  int x,y;

  double d;//detail

  double r;

  const double pi = 3.14159265; //more or less
for(d=0, r=0; d<=8*pi; d+=0.01, r+=0.1)//you can play with the value to be added to d

  {

    x=rx+sin(d)*r;

    y=ry+sin(d+(pi/2))*r;

    putpixel(x,y);

  }

}
This would work, but there is even a better way. We could alter the sine function to change r automatically. By changing sin(x) to sin(x)*x we get:
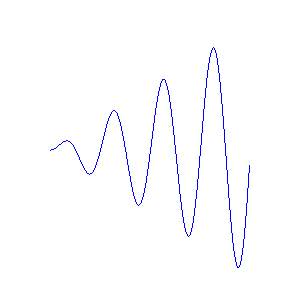
Now we only have to alter the algorithm:
void spiral(int rx, int ry)

{

  int x,y;

  double d;//detail

  double r(10);//this alters the distance between different tracks of spiral

  const double pi = 3.14159265; //more or less
for(d=0; d<=8*pi; d+=0.01) //you can play with the value to be added to d

  {

    x=rx+(sin(d)*d)*r;

    y=ry+(sin(d+(pi/2))*(d+(pi/2))*r;

    putpixel(x,y);

  }

}
As you may notice the spiral gets more broken the farther it gets. You could fix this by decreasing the number that is added to d each time or by using our line function instead of putpixel:
void spiral(int rx, int ry)

{

  int x,y,p=rx,q=ry;

  double d;//detail

  double r(10);//this alters the distance between different tracks of spiral
const double pi = 3.14159265; //more or less

  for(d=0; d<=8*pi; d+=0.01) //you can play with the value to be added to d

  {
 x=rx+(sin(d)*d)*r;

    y=ry+(sin(d+(pi/2))*(d+(pi/2))*r;

    line(x,y,p,q);

    p=x;

    q=y;

  }

}
And that’s it!
Maybe I’m lame, but can you tell how to draw 10 nested 3D squares?
I tried many ways but I got stuck.
thanks.
This is a very good article. On the internet I surfed a lot and got complicated logic but this is very simple one and still perfect one.
thanks for the post